
Getting started: Yield Management
Overview of Pricing optimization tools.
Prerequisites :Before proceeding with this article, it's recommended to read & master the following readings:
- Static markups - Click here.
- Dynamic markups - Click here.
What is a "Markup"?
"Markup is the term used to describe theprofit earned on a sale, representing the difference between the purchase price and the selling price of an item."
What is "Yield Management"?
"Yield management is a pricing and revenue management strategy that is used to maximize business performance and profits."
Overview
This guide provides a comprehensive walkthrough on configuring and mastering Yield Management & Markup Features, focusing on both "Static Markup" and "Dynamic Markup" strategies.
The objective is to enhance profit maximization while maintaining a competitive price.
The article is conveniently structured into sections:
- Static Markup.
- Dynamic Markup.
- Additional Information.
Which covers: winning rate selection both in Dyn.markup and Best Packages, as well as Price Biasing. - Further Yield Optimization.
Which covers: SmartBook, Rebooker & Hotel Rules. - Auditing/Review of Dynamic Markups.
Feel free to navigate to the section that best suits your needs.
Static markup
Step 1 - Prerequisites
Before going ahead and starting to apply static markups to your connected suppliers (a.k.a. Contracts/Accounts), it is crucial to prepare some data in advance, such as:
- Who are the connected suppliers, and for which are supported ?
e.g. static markup can be added only for Net type contract, as Gross type is commissionable - which we can't markup . - What type of static markup are we applying - fixed fee or by percentage ? and how much in terms of staying competitive & profitable ?
- In which layer of the hierarchy (Client/Nodes/Users) are we applying the markups ?
e.g. If the markup is applied on Sub-Node level, the users under this Sub-Node will not able to see the suppliers Net price, but only the parent sell price, which is including the markup.
Once the end-goal is defined and clear and the settings and configuration is clear, it's time to start applying these.
Step 2 - Configuration & Testing
NOTE :It is highly recommended to test the "Static markups" in Cert (testing environment) before applying these in Production - which directly impact your Live environment.
Understanding Hierarchy
As discussed in this article - Understanding Hierarchy.
Once navigating to the "Manage Company screen", choose the wanted Node/User to apply the Static markup to :
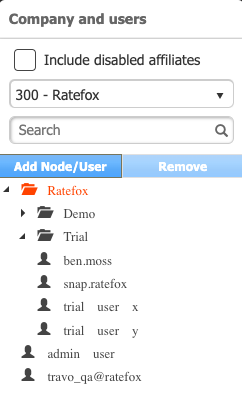
- Applying "static markup" at the Client Node (e.g. Ratefox) ensures that all Sub-Nodes (Demo & Trial) and their users inherit these markups.
Regarding data visibility, only the admin user can view the specific markups applied, while Sub-Nodes and users will see only the parent selling price, which is inclusive the markup. - When "static markup" is applied to a Sub-Node (e.g. Trial), all the users under this node inherit the markup.
In terms of data visibility, this markup visibility is restricted to the admin user or users at the same hierarchical level. Regular users will only have access to the parent selling price, which is includes the markup. - Applying "static markup" directly to a user (e.g. trial user x) results in the markup being specific to that individual user.
In this scenario, both the user and the admin have the ability to view the applied markups.
How to allow user to view markups?
In order to allow users to view the actual supplier Net price along with the FinalPrice (which is inclusive markups) :
Apply the markup directly to the user, for example, once applying the static markups to "trial user x" :
-
Apply the markup in the users hierarchy, Hence, in the lower section (trial user x -> Client).
And not in the upper section (Trial -> trial user x) - as this result the user to see the parent selling price .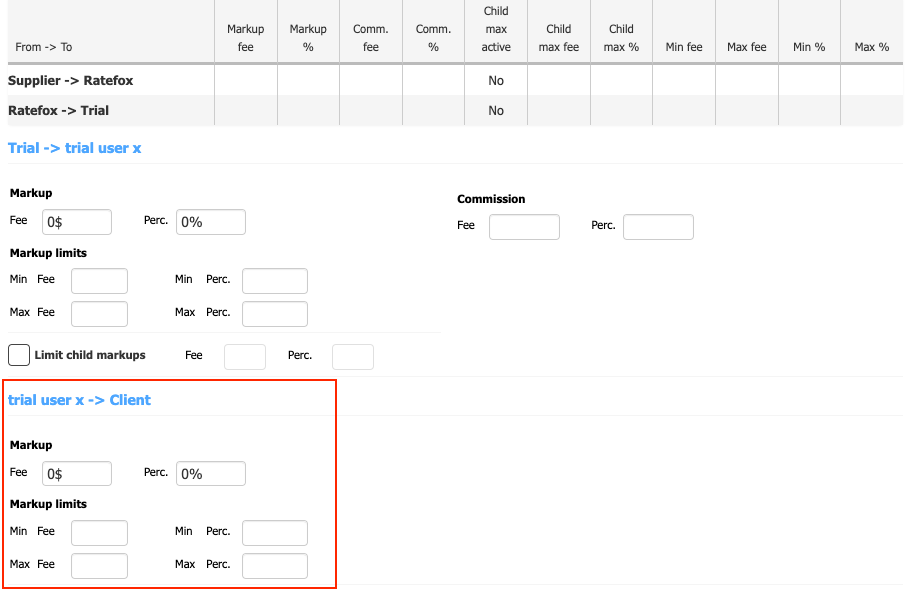
Step 3 - How markups are reflected?
Perform a Hotel Search & GetPackages to examine and verify that the added markups are operating as expected - there are two methods available.
For more information - Click here.
Step 4 - Apply to Production & start maximizing profits
After completing all the steps and successfully testing the markups in the Cert (testing environment) to ensure they are reflected correctly, the next step is to replicate these settings and configurations in the Production (Live environment).
Once this transfer is complete, the applied markups will immediately affect your searches and the pricing of packages as shown in the GetPackages response. With everything in place, you can begin to reap the benefits of your configurations.
Dynamic Markup
It's highly recommend to familiarizing yourself with the system before proceeding with the configuration. This will enable you to use the feature effectively and avoid any potential issues.
Step 1 - Prerequisites
Before starting using the "Dynamic markup" feature - it is necessary to plan ahead, as this feature is advanced and complex.
By planning ahead it will enable you to use the feature effectively and avoid potential issues.
As the "Dynamic markup" is automated and has complex business logic, prepare the following data in advance :
- Which of the connected suppliers are the MPS (Market price source) & which are "DMT" (Dynamic markup target) ?
A valid configuration should include at least one MPS contract (account), which will be Gross type.
And at least one DMT contract (account), which will be Net type. - Define the "price delta" - to determine parity among the two lowest-priced MPS offers with parity offers.
This helps ensure price competitiveness and alignment with the market. - Define the percentage price decrease allowed for non-parity offers.
This setting allows you to adjust prices for non-parity offers, enabling you to remain competitive . - Define the Min & Max markup limits, sets the upper and lower threshold for the DMT packages.
This ensures that the final price stays within the acceptable range and maintains consistency with the node's pricing policies.
Step 2 - Configuration & Testing
NOTE :It is highly recommended to test the "Dynamic markup" in Cert (testing environment) before applying these in Production - which directly impact your Live environment.
Choose the Market price source & Dynamic markup target
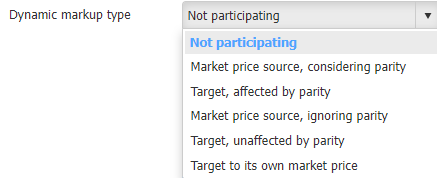
For each contract (account) - there's an option to configure the "Dynamic markup type", once navigating to the "Contracts screen" --> choose your desired Supplier and Contract --> and then - choose the "dynamic markups type" from the drop-down list :
Define the Min & Max markups
Setting minimum and maximum limits (as detailed in the "Static Markup" section) guarantees that the final price remains within an acceptable range, aligning with the node's pricing strategies.
e.g. if the maximum markup is set at 15%, and the Market Price Source (MPS) establishes a market price with a difference exceeding 20%, the maximum markup limit will ensure that the markup does not surpass 15%. This method ensures a balance between competitiveness and profitability.
Similarly, this principle applies to the minimum markup limits as well.
Enable "Dynamic markup"
As previously discussed in this article, choose the relevant Node/Sub-node/User to apply the "Dynamic markup" logic to.
This can be achieved by navigating to the relevant Node --> and clicking to open the "Operational setting" :
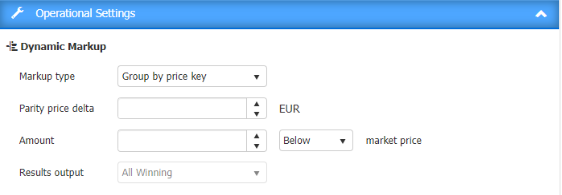
Once the "Dynamic markup" is enabled and configured as per your desired output, go ahead to the next step.
Step 3 - How markups are reflected?
Perform a Search Hotels & GetPackages to examine the Dynamic markups logic, please refer to the following article : Click here.
Step 4 - Apply to Production & start maximizing profits
After completing all the steps and successfully testing the dynamic markups in the Cert (testing environment) to ensure they are reflected correctly, the next step is to replicate these settings and configurations in the Production (Live environment).
Once this transfer is complete, the applied dynamic markups will immediately affect your searches and the pricing of packages as shown in the GetPackages response.
Additional Information
Winning Rate Selection
What is "Winning Rate" ?
The “Winning Rate” is the cheapest while the most profitable package (Rate) among the packages (Rates) which are returned by the connected suppliers and contain similar attributes:
- Room name and its attributes (view etc)
- Rate (refundable/non refundable)
- Meal plan (board basis).
- Availability (on request / available)
"Winning Rate" in Dynamic markup Logic
As explained in the Dynamic Markup section (Click here), once inspecting the “DynMarkupDumpWithPrices.csv” - for each “BucketKeyForDisplay” - there’s only one “Winning Rate” which is set as “True” - this package, is “winning” due to it is the most cheapest while is the most profitable.
For example :

As can be seen :
- The Winning Rate is the cheapest Rate.
- The Winning Rate is the most profitable among the cheapest packages.
"Winning Rate" in Best Packages Logic
As explained in the “Best Packages” section (Click here), once enabling this feature :
“The "Best Packages" feature enables removing redundant hotel packages from the search results.”
Here, the “Winning Rate” - will be the cheapest rate within the same room characteristics such as : Refundability, Availability, Bedding, View etc.
For example :
Supplier 1 returned : “Standard Room, Queen bed” refundable. Net price : 150$.
Supplier 2 returned : “Standard Room, Queen bed” refundable. Net price : 155$.
Supplier 3 returned : “Standard Room, Queen bed” refundable. Net price : 122$.
In such a case - The system returns to the user only the best available packages, instead of an endless list of packages which includes irrelevant offers.
Hence, instead of 3 packages - the GetPackages response will contain only the package (rate) which returned from Supplier 3 - which is the cheapest.
Price Biasing
Price biasing allows the functionality to manipulate the “Winning Rate” under the Dynamic markups logic.
This is achieved by adding some % to the FinalPrice, which is not reflected in the GetPackages response - but solely added to be considered by the Winning Rate selection.
By doing so - there’s more “chances” to some supplier to be the “Winning Rate”.
Note:The “Price Biasing” will not add the percentage defined to the actual package price, but only will consider this addition in the business logic level.
To configure “Price Biasing Settings” :
Go to the “Main Node” under “Manage Client” settings → and then click on the “Price Biasing Settings” section. (The following screen will pop-up) :
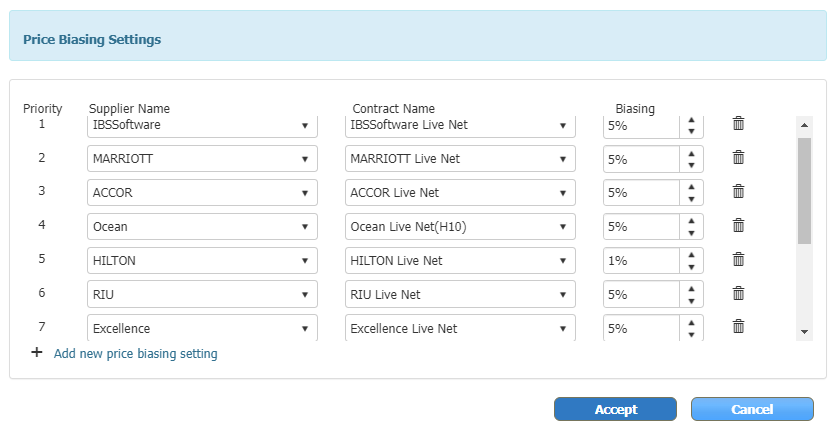
For example :
All the suppliers (except HILTON) are going to be biased by 5% addition to the FinalPrice, but HILTON will be only going to be biased by 1% addition to the FinalPrice.
This ensures that the packages from HILTON, will have more chances to be the “Cheapest” - which will give it priority among the other suppliers to end-up being the “Winning Rate”.
How price biasing “Price Biasing” impacts the rate selection - “Winning Rate”
The “Price Biasing” tailored for Dynamic markup feature - which directly impacts the winning rate selection.
To ensure that your wanted supplier is biased to be the “Winning Rate” - give the lowest percentage under the “Price Biasing Settings”, this will directly impact the winning rate selection by biasing the prices as your preferences .
Further Optimization
SmartBook
SmartBook is crafted to enhance the success rate and profitability of hotel bookings.
Bookings might not go through due to issues like the supplier declaring a "sold out", "price change" or other errors at the time of booking.
SmartBook empowers the system to exhaust all options to ensure a booking is successful at the chosen hotel.
SmartBook has 2 modes :
- ProfitGen -
ProfitGen operates by searching for more affordable rates while keeping the room type, basis, cancellation policy, and other factors unchanged. It then secures the more economical rate, aiming to enhance and maximize profits for each booking inquiry. - ErrorRecovery -
ErrorRecovery triggers when a booking fails due to sold-out rates, unavailability, or price changes. It then locates a comparable rate for the unsuccessful booking and rescues the booking attempt.
More information - Click here.
Rebooker
Rebooker is a post-booking process that maximizes profit for existing bookings.
Rebooker enables the offline rebooking of existing refundable bookings:
- After the booking was made, The Rebooker will track changes of the available Net rates for the hotel room booked by the consumer.
- Based on predefined logic, like a price drop of more than X%, the Rebooker will book the same accommodation from the same or alternative provider of the inventory and cancel the original reservation automatically.
More information - Click here.
Hotel Rules
Hotel rules is a tool that allows Partners to manipulate the results that are returned from HSP API.
For example, partners can decide to automatically hide certain locations or hotels, increase markups per specific criteria, apply discounts based on conditions and even run special campaigns.
More information - Click here.
Auditing/Review of Dynamic Markups
In each session, you have the opportunity to examine the rate selection process that occurred during the search to book session.
This includes various pieces of information such as:
- Runtime Data: Contains user-specific details like UserId, UserName, and a default response timeout setting.
- SessionId: Acts as a unique identifier for the session.
- Search Request: Provides details about the user's search, including the date, place of residence, currency, check-in and check-out dates, number of rooms, occupancy, and timeout settings.
- Supplier Calls: Details the communication with various suppliers using specific hotel keys and account details. It notes if a timeout occurred and the response from the supplier, which may be null or contain data on hotels and packages.
- Packages: Offers detailed information on various hotel packages available. This section includes account and supplier information, timeout occurrences, hotel ID and name, and extensive details on available packages. Each package is uniquely identified and includes information on pricing (original and converted), refundability status, and markup details.
With a dedicated Business-Intelligence JSON file, all this information is accessible along with various groupings that occurred.
For each room returned in the search results, you'll receive details on:
- Applied rules.
- Profits.
- Final price calculations.
- Available rooms
- room basis
- Availability
- Room type
- Etc.
This comprehensive data allows for a thorough understanding and review of the rate selection and booking process.
For example BI-JSON file - Click here.
Updated about 2 months ago